If you are a blogger, like me, having many people visit your blog is your primary goal. And there is one essential tool, Pinterest, that can help you, and you should learn about
Over the years that I have been blogging, Pinterest has been very useful in helping me driving traffic to my websites.
Unlike other online platforms, Pinterest has features and capabilities of increasing traffic to your blog.
In this article, I would like to give you an excellent strategy that I have been using to drive traffic from Pinterest to my blog.
Why Pinterest is an excellent platform to get visitors to read your blog
But first, let me discuss why Pinterest is an excellent platform today to get visitors to read your blog.
Pinterest comes with so many benefits, and these are the reasons why most bloggers are using it more often today;
- Pinterest gives free traffic to your blog (unless you do Pinterest ads)
- Unlike other platforms, the Pinterest user demographic consists of individuals who are looking for information. If you provide valuable content, you can be guaranteed to increase traffic to your blog over time.
- Pinterest is easy to use. You do not need any technical skills to use Pinterest. Even if you are a beginner, you will understand how it works within a short time.
- In fact, this article covers just about everything you need to know about using Pinterest.
- It makes work more manageable because you can automate tasks. You can always schedule your pins to be posted at a later date.
How To Drive Traffic From Pinterest
Here are some of the methods that I have used to grow my blog using Pinterest.
Create a Business Pinterest Account
The first and foremost thing to have is a Pinterest Account, more specifically, a business account.
A business account comes with enhanced features that are useful in helping more people read your blog.
If you already have a personal account, you can convert it into a business account. You will still have the same followers and pins.
Follow the steps outlined below;
- Log in to your personal Pinterest account
- Go to settings by clicking on the drop-down button on the top right hand of your screen
- Click on account settings and select account changes
- Select convert account and put all the profile information
- Click next and describe your business
- Select if you want to run ads
- Pinterest will prompt you to select where you want to start. You can also close that section and continue to your Pinterest Business account.
If you are just getting started using Pinterest, here is a step-by-step guide to creating a Business Pinterest Account.
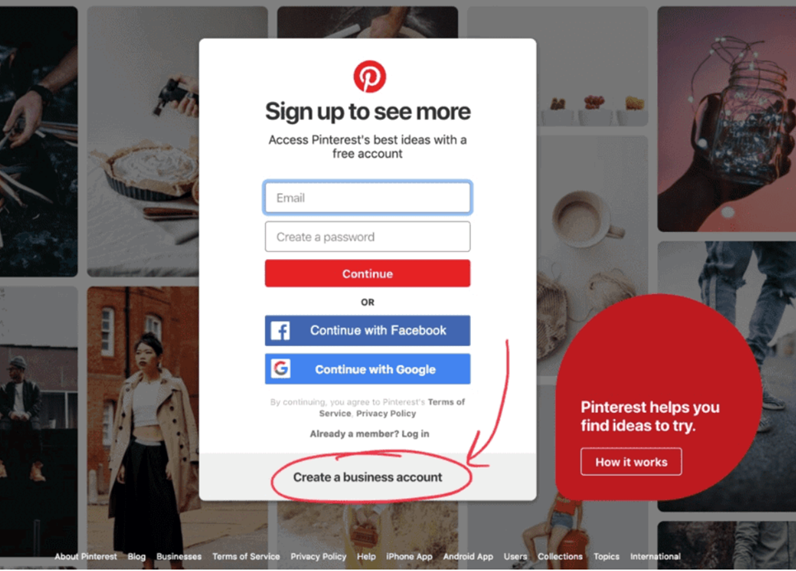
Go to the Pinterest Homepage by typing www.pinterest.com on your search engine.

You will click on the create business account, and Pinterest will ask you to follow most three topics.
When you follow these topics, your home feed will contain relevant information on those.
What I have found important is following topics related to my niche. This enables me to be updated on trends in my industry.
Fill in your profile information
Just like you would with other online platforms like Facebook, you should also fill your profile information on your Pinterest Account.
You will fill in details such as your business name, picture, username, about you, and location.
And you can always make these changes later in the settings section of Pinterest.
Based on my experience, I have found out that using a personal image of yourself is an excellent way of connecting with your audience.
However, you can always use images such as a logo of your business. You can use Canva to edit your images.
It is also wise to use about two keywords in your bio for Search Engine Optimization purposes.
Claim your website
Another essential thing to do is claim your website. Claiming your website helps Pinterest to know that the content you share is yours.
I also find it helpful if you want to do intense marketing of your website. This is because you can analyze the posts that are performing well and the kind of content that is bringing more clicks and traffic to your website.
If you want to claim your website, follow the instructions below;
These instructions are for WordPress users, and to easily claim your website, you need to install a Yoast plugin first into your website.
- Click on the profile picture on the top right-hand corner and select settings
- You will find “Claim Website,” enter your URL and click on claim website
- A box will pop up. Choose the "Add an HTML tag." A code will be provided; copy it.
- On a new window, go to the WordPress dashboard and click on the social link under the Yoast SEO settings
- Go to the Pinterest tab and paste the code you copied from Pinterest into the confirmation field.
- Save the changes and go back to Pinterest, follow the prompt, and click verify
- Pinterest will automatically check for the HTML tag and claim your website
Pinterest will claim your website within 24 hours after you initiate the process
Note that you can only claim your website using a laptop or computer
Create Pinterest boards
Now that you have set up your account, it is now time to start being active on the platform by creating boards.
If you are new to using Pinterest, you might be wondering what Pinterest boards are. When I first started using Pinterest, I also did not know what boards were.
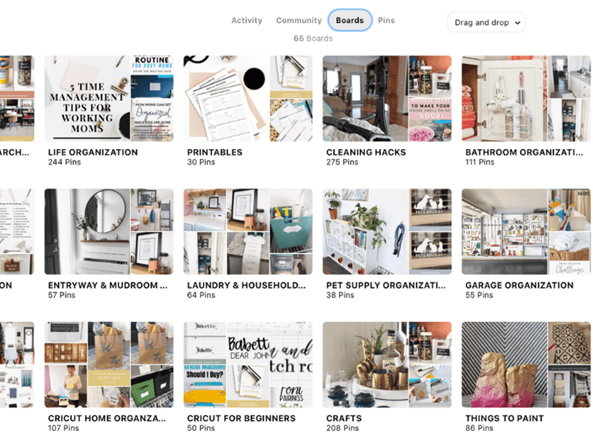
Pinterest boards provide a way to organize your pins on Pinterest. They are where you save, collect and organize your pins.
If you are just getting started, I would advise that you create at least five boards.

You need to optimize your boards so for easier discoverability on Pinterest. And the best way to do this is by using searchable and popular keywords.
Start by naming your boards in a way that Pinterest users can easily find them.
Let me give you an example of board titles. If you are blogging about fitness, you can have boards with the following names;
- Weight loss tips
- Meal plans
- Cardio exercises
- Resistance training
- Yoga
Just by seeing those names, a Pinterest user will know the board is relevant to them.
You should also use few relevant keywords in the board description.
You can always customize the names for boards and have different cover photos for each. Go to the board settings and edit such information and upload the cover photo.
Once you are done creating the boards, start adding pins. You need to add at least 50 pins to each board to warm up your account and create relevance.
Join Group Boards
To increase traffic from Pinterest, you might also consider joining a group board. Pinterest group boards are boards that have more than one contributor.
They are created from someone else’s account, which gives access to others. You will need to send them an email so that they can add you to the group. You will normally find their contact in the board description.
Over the years, they have been excellent as your pins get to reach more people. When you save content to a group board, others see it even though they are not your followers.
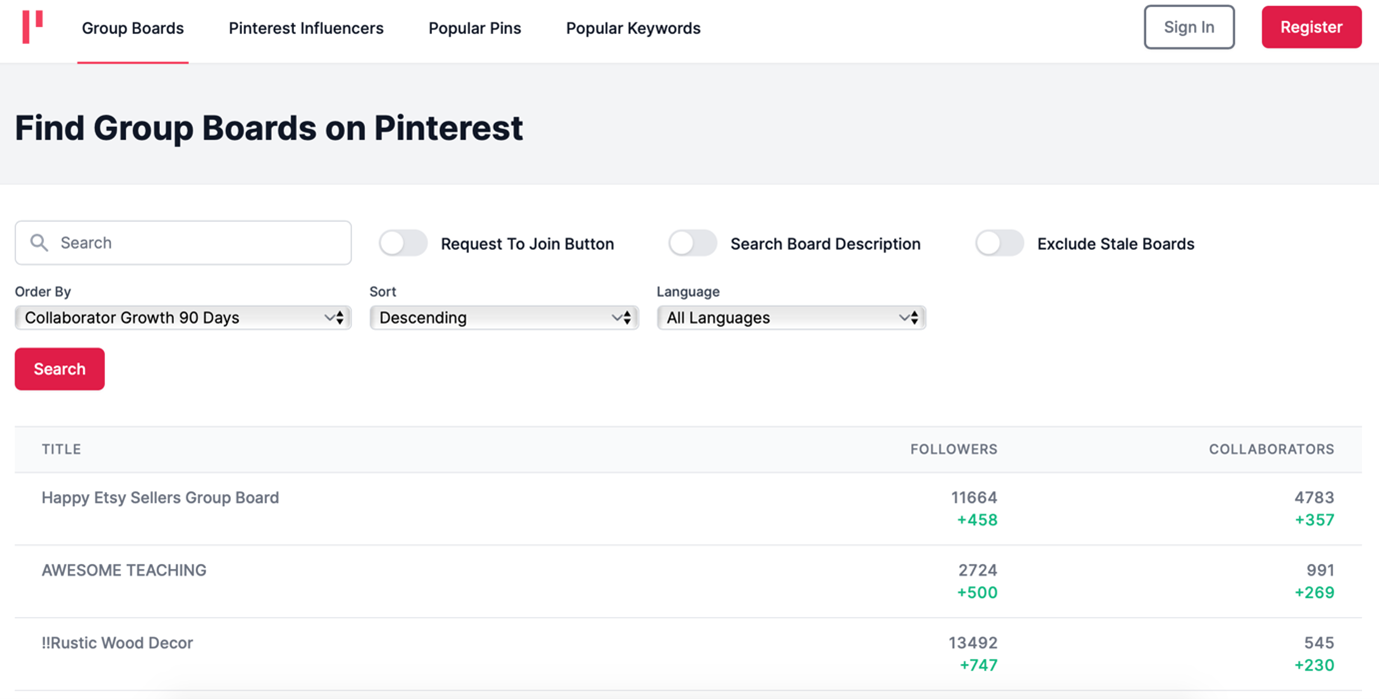
To join a group board, visit PinGroupie, follow and join the ones you prefer.

There are several Pinterest group boards, and all of them are relevant to different fields and niches.
I advise that you join group boards relevant to your niche, as this will increase the chances of your content reaching people interested in it.
For instance, if you are blogging about pets, it would not make sense for you to join a group about teaching. Your pins would not interest anyone in that group as your topic is not relevant to them.
As such, search for groups related to your area of specialization and join.
It is also wise to join group boards that have more followers than yours
Create Pins
Now that you have your boards ready, the next important thing is to start creating pins.
Pins are basically what you will be posting and saving on your boards. When a user clicks on them, they will be directed to your blog.
There are different kinds of pins you can pin, which include;
- App pins; These must include an install button so that users do not have to leave Pinterest to install the app.
- Product pins; These are for selling products and must include the name, pricing, availability, and a link to where they can be bought.
- Article pins; These are used by content creators and bloggers. They include the title of the article, author name, description, and source link.
- Recipe pins; These are used by cooking blogs, restaurants, and food-oriented shopping sites. They include details such as a finished recipe, cook time, ingredients, and serving info
- Movie pins; These are excellent for websites that promote, review and discuss movies. They include content ratings, reviews, cast members, directors, and leading actors.
- Place pins; Place pins are designed to help users locate new places. They have maps, address, and phone numbers. They are valuable for websites that deal with vacations, tours, and travel.
Before you can even start pinning, you will need to create appealing images that prompt the user to read your blog the moment they see it.
You can use your images or download images from platforms such as iStock, Freepik, and Pixabay. Note that some photos from these sites are free, while for some, you have to pay to be allowed to use them.
I usually create my Pinterest images using Canva. This tool is easy to use, and it has Pinterest image templates that you can customize.
Once you have the images ready, you can proceed to upload them on your Pinterest account by following these steps;
- Log in to your Pinterest Profile and click on the plus sign (+)
- Access your profile by clicking on your name or picture
- From the dropdown menu, select “Create Pin.”
- Upload an image and add a title
You remember the image you created and saved on your computer? You now need to upload it.
If you already have the image in your blog or somewhere on the internet, you can select save from the site, and the image will be upload automatically.
Always ensure to use high-quality images.
Then proceed to add your title. While at it, ensure that the title is captivating and immediately promotes the user to read the entire blog.
Let me give you an example. If you blog about weight loss, a title like “Weight Loss Tips” is good, but you can make it more captivating by writing it this way, “Weight Loss Tips That Will Help You Lose Weight Fast.”
The second title is more convincing than the first one.
- Add a description
Next, you will include a description of what the blog is all about. It should be precise but also effective in making a Pinterest user go through your blog.
To optimize pin descriptions for easier discovery, use hashtags that are related to your niche.
For instance, if your topic is about “Factors to consider when building a house,” the hashtags can be #houseconstruction #modernhouse #houseplans #housedesigns, etc.
- Add a destination link
A destination link is vital. Include a link that directly leads the user to the specific article that you have created a pin for.
- Choose a board and publish
Finally, choose a board and publish.
Pinterest has a scheduler that allows you to schedule pins for future posting. This saves time and makes it possible for you to be active on Pinterest without posting every day.
The Pinterest scheduler allows you to schedule pins for up to two weeks, and you cannot schedule more than 100 pins.
You are also allowed to make updates like publishing the pins immediately or deleting the pins that you have scheduled
That’s it; that is all you need to do to create pins.
Here are other things to remember when creating pins;
Create fresh pins- do not spam
As a blogger, the most important thing to offer your audience is to ensure that they can enjoy and benefit from your content every time.
An excellent way to achieve this is by ensuring that your pins are fresh all the time. Do not post the same pins all the time. Use different titles, descriptions, and images.
Otherwise, users will get bored, and the chances of them going through your blog will decrease.
Pin consistently
I always insist on consistency to build your blogging business, and this also applies to Pinterest.
If you want to drive lots of traffic from Pinterest, you have to keep on pinning new pins daily.
Pinning consistently is also another excellent way to keep your audience engaged and increase your followers. People love new and great content.
Based on my experience, I would recommend that you pin every day – at least one pin.
Note that Pinterest has a limit to the number of boards, pins, and follows that you can have. You can only have up to 5000 boards, 200,000 pins, and 50,000 followers.
Promote pins
When you post valuable and evergreen content, you can gain free traffic from Pinterest.
Sometimes, however, you want to make the process of acquiring traffic faster. And you can do this by using promoted pins. I have always found them helpful.
This is doing paid advertisement just like you would do on Facebook or Google.
To create an ad on Pinterest, click on the Ads button at the top on the left hand of the screen and then select create an ad.
Pinterest will prompt you to select the pins that you want to promote, edit and review them. If you have met the advertising guidelines, you can launch the advertising campaign.
I do promote pins once in a while, but my primary strategy is pinning consistently.
Post during peak hours
When posting on Pinterest, the best time to do so is during peak hours when many people can see your pin.
The best time to pin depends on the type of content and audiences that you target. It is recommended to pin between 8 pm-11 pm EST and between 2 am-4 am EST on Pinterest
If you target people who work from 9-5, you can post before and after work hours and during lunch breaks.
Enable rich pins
Rich pins are types of pins that sync information from your website and to your pins. This means that if you change information on your website, it will be updated on the rich pins
Rich Pins are usually identified by the extra information above and below the image. They are free to use, but you must enable them first.
Here is an excellent example of pins with rich pins and one that does not have rich pins.

There are different kinds of rich pins that you can use, e.g., articles, apps, products, and recipes.
To enable rich pins, you need to enable metatags and install a plugin on your website. The process can be complicated, and I recommend hiring a web developer or coder to do that for you if you are not confident enough.
You can read more about enabling rich pins here.
- Search for individuals and brands in your niche and follow them
Following other experts in your niche is also helpful in driving traffic from Pinterest.
Doing this has helped me connect with like-minded people, and I have learned a lot.
Optimize your page for search
Optimizing your page for search will also make more people discover and read your blog. This is done using SEO, search engine optimization.
SEO mainly means using popular keywords in your articles and pins, which increases the chances of being found when a user searches using those keywords.
Always ensure to use relevant keywords in your board names and pin descriptions.
For instance, if you blog about cooking, you can include keywords such as cooking tips, kitchen, healthy utensils, recipes, gadgets, etc.
These are words that people will use when searching for such information, and they are likely to come across your blog.
To find relevant keywords, I usually search for the main keyword on the search bar on Pinterest. When I do these, I get several suggestions, and those are the words I use.
Looking at the image above, you will realize that Pinterest gives me related keywords, and it even suggests to me people that I can follow in that niche.
You should also optimize your pin images by ensuring that relevant keywords are on the image itself.
Pinterest can read texts on images, and if you use the right keywords, you will increase your chances of your blog being found by users.
Conclusion
There you have it!
These are some of the practices that I have embraced and drive traffic from Pinterest to my blogs.
If you are a beginner, you might find all this information overwhelming. I was once there, and it can seem to be too much.
But I would advise you to implement each step at a time. Creating a Pinterest account is easy, and ensuring that Pinterest brings you good traffic is the major work.
If you find that the work is too much for you, you can hire a Pinterest virtual assistant.

