The birth of WordPress in 2003 didn’t push web developers out of their jobs. It created a vast opportunity for just about anyone who wants to build a brand presence on the web.
For bloggers, that opportunity is the ability to create professional websites from scratch in under 60 minutes without writing code.
Today, WordPress powers nearly 40% of the web, a number that makes it the most popular Content Management System on the planet.
With WordPress, you can change your domain from just another random name on the web into a content powerhouse and a moneymaking machine.
It all starts with the right setup.
So in this guide, I’ll show you how to set up your WordPress blog from the ground up in under an hour, even if you have never written a piece of code in your life.
Let’s get started.
How to Create a Professional WordPress Blog in 60 Minutes
This is by far the most beginner-friendly guide that you’ll ever read on creating a WordPress blog.
We cover everything you need to know, leaving out what’s not essential, so that you can build a search engine and user-friendly blog.
Step 1: Buy a Domain Name
The first step to setting up a WordPress blog from scratch is to choose a domain name.
While there are many ways to come up with a domain name to use, using the niche selection criteria can be an easy approach.
If you’ve picked the parenting niche, for example, you should consider registering a domain name that reflects motherhood, fatherhood, general parenting or anything in between.
Why?
Because the name you choose is what represents your blog. And if you choose a name that your audience can identify with, they’ll build confidence in your business, consume your content, and trust your brand.
We’ve shared quite intensively on how name your blog here. But the summary is that you should choose a brandable domain name.
To choose a domain name for your blog:
- Using the form below
- Type in your desired domain name in the search form
- Choose an LTD (domain extension), and then click the search button.
Note that you will get a free domain when you choose to host your wp blog with Bluehost.
Allow Bluehost to check if the domain is available for registration. The system will automatically add the domain to cart if it’s available for purchase.
If the domain isn’t available for registration, Bluehost will give you some suggestions to pick from, making your domain search process quite easy.
With Bluehost, a .com domain goes for $12.99 a year, which isn’t expensive even for newbie bloggers. If you need Privacy and Protection throughout the year, you’ll need to add $11.88 to the initial cost.
The total cost will be $24.87, which, in my opinion, isn’t a bad offer.
Step 2: Get a Hosting Package for Your Domain
Now that you’ve picked a domain name for your blog, it’s time to choose a hosting service in readiness to bring your website to life.
While there are many website hosting companies on the web, I recommend Bluehost because it’s one of the best and well-known hosts for WordPress Websites.
Bluehost is a good hosting platform for beginners to blogging because it has favorable pricing plans, which start at only $3.95 a month.
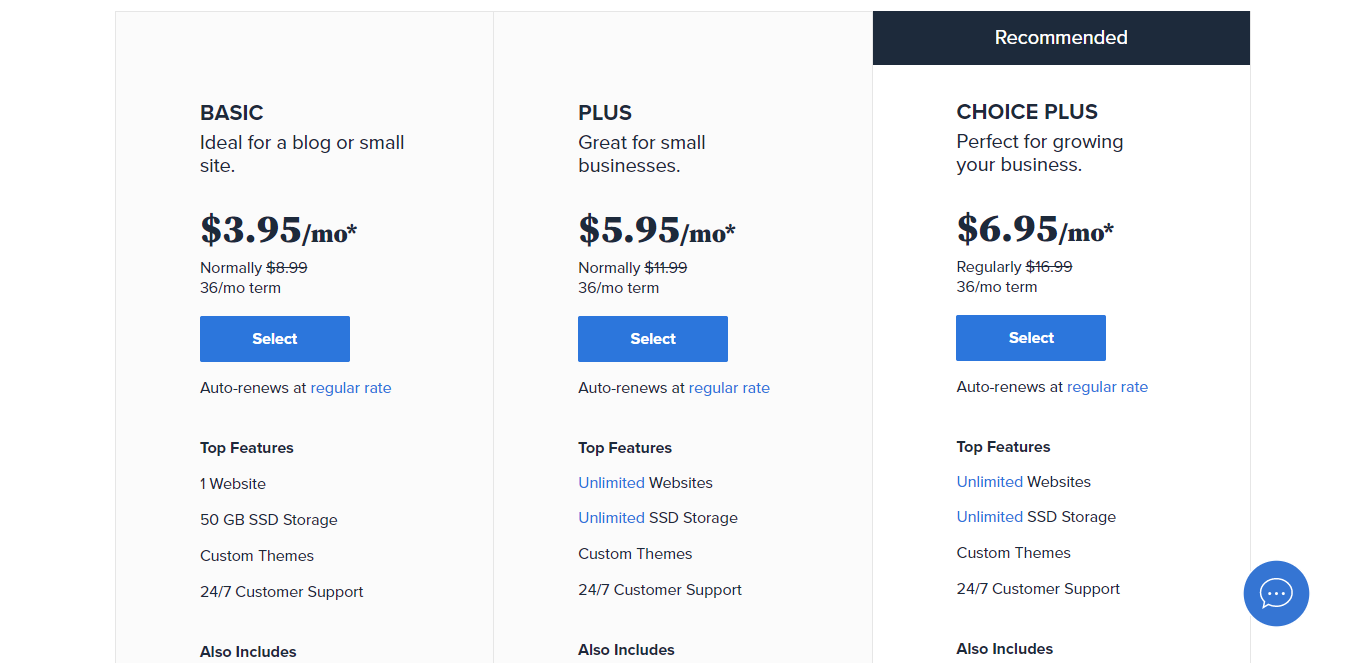
Plus, if you choose to host your blog with them, you’ll get a free domain for the first year, which normally costs between $10 and $20 depending on the registering company.
To get started with Bluehost web hosting service:
- You should click here to choose a plan.
- On the next screen, create a new domain name that you would like to use for your brand. This will be your website address through which people will find your website when they search for it online.
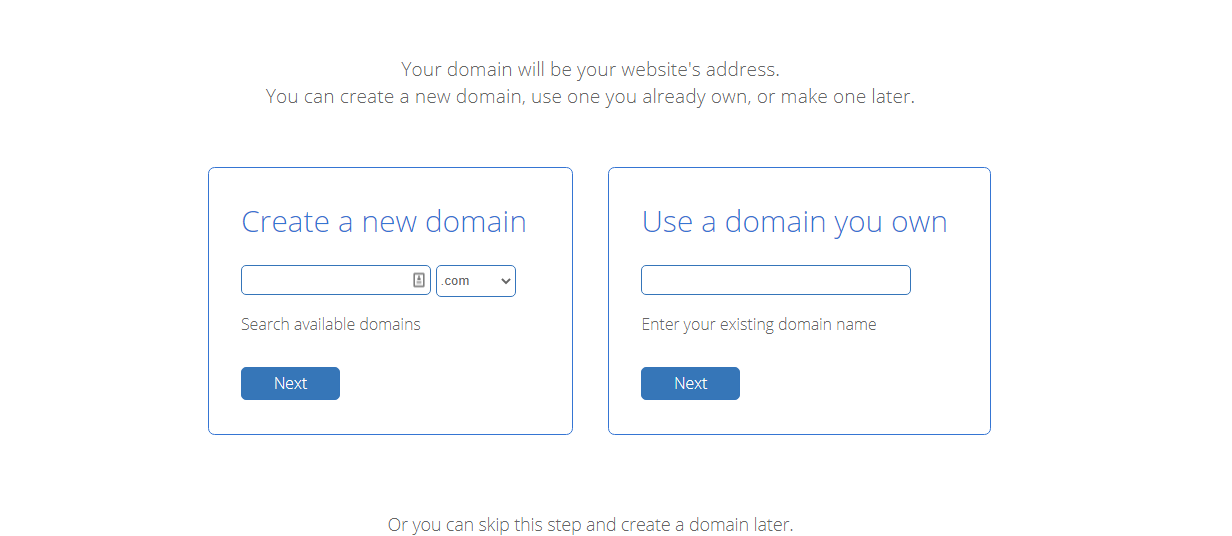
- Once you enter your desired domain name and select the extension, click next to create your account.
On the sign up page, you’ll have to provide your personal information for identity. Go ahead and fill out the account information as requested on the form.
Make sure you enter a correct email address as Bluehost will send you a receipt to it.
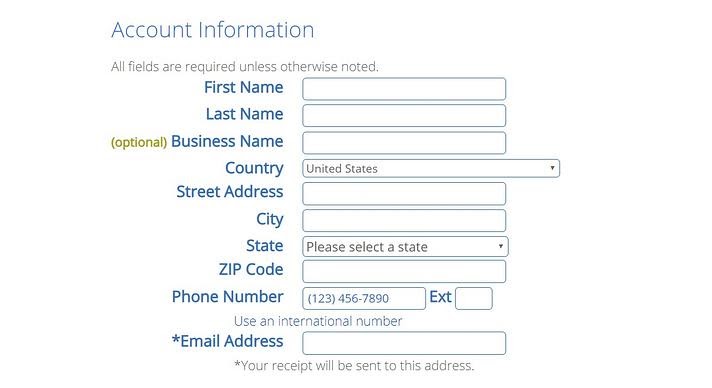
Once you provide your account information, move on to verifying your hosting plan details. This is easy takes about 10 seconds to complete.
Do keep in mind that Bluehost will display the page information on the same signup screen. Make sure you check the information carefully to be certain that the features added to the package are exactly what you need.

Choose an appropriate plan from the Account Plan drop down menu.
The standard commitment is usually a year. But you can choose a 24 or 36 months plan, with the 36 months commitment getting you some huge discount.
Some premium features that Bluehost is will add to your account include:
- Bluehost SEO Tools, which costs about $23.88 a year
- Site Lock Security, which starts from $23.88 a year
- Domain Privacy Protection, which costs $11.88 a year
Unless you feel like these are must-have, feel free to cancel them from your subscription plan. Otherwise, Bluehost will charge you.
Apparently none of these features are essential when starting out. The most important thing for now is a domain name and a hosting plan for your blog.
However, if you feel like you need the extras, feel free to include them in your package before checking out.

The final step in the domain and hosting registration is to provide your payment information so that Bluehost can process your request.
- Enter your payment details in the form provided
- Read and agree to the company’s terms and conditions of service
- Then, click the green submit button
- Allow Bluehost a few second to process your transaction and send you information about your registration
Check the email you used for the registration for the confirmation message for the transaction from Bluehost. The email also includes your Bluehost’s account login details.
Step 3: Install WordPress
Now that you have a domain name and hosting plan ready, the only thing left is to install WordPress and customize your blog ready for content development and publishing.
Fortunately, Bluehost makes setting up a WordPress site very easy.
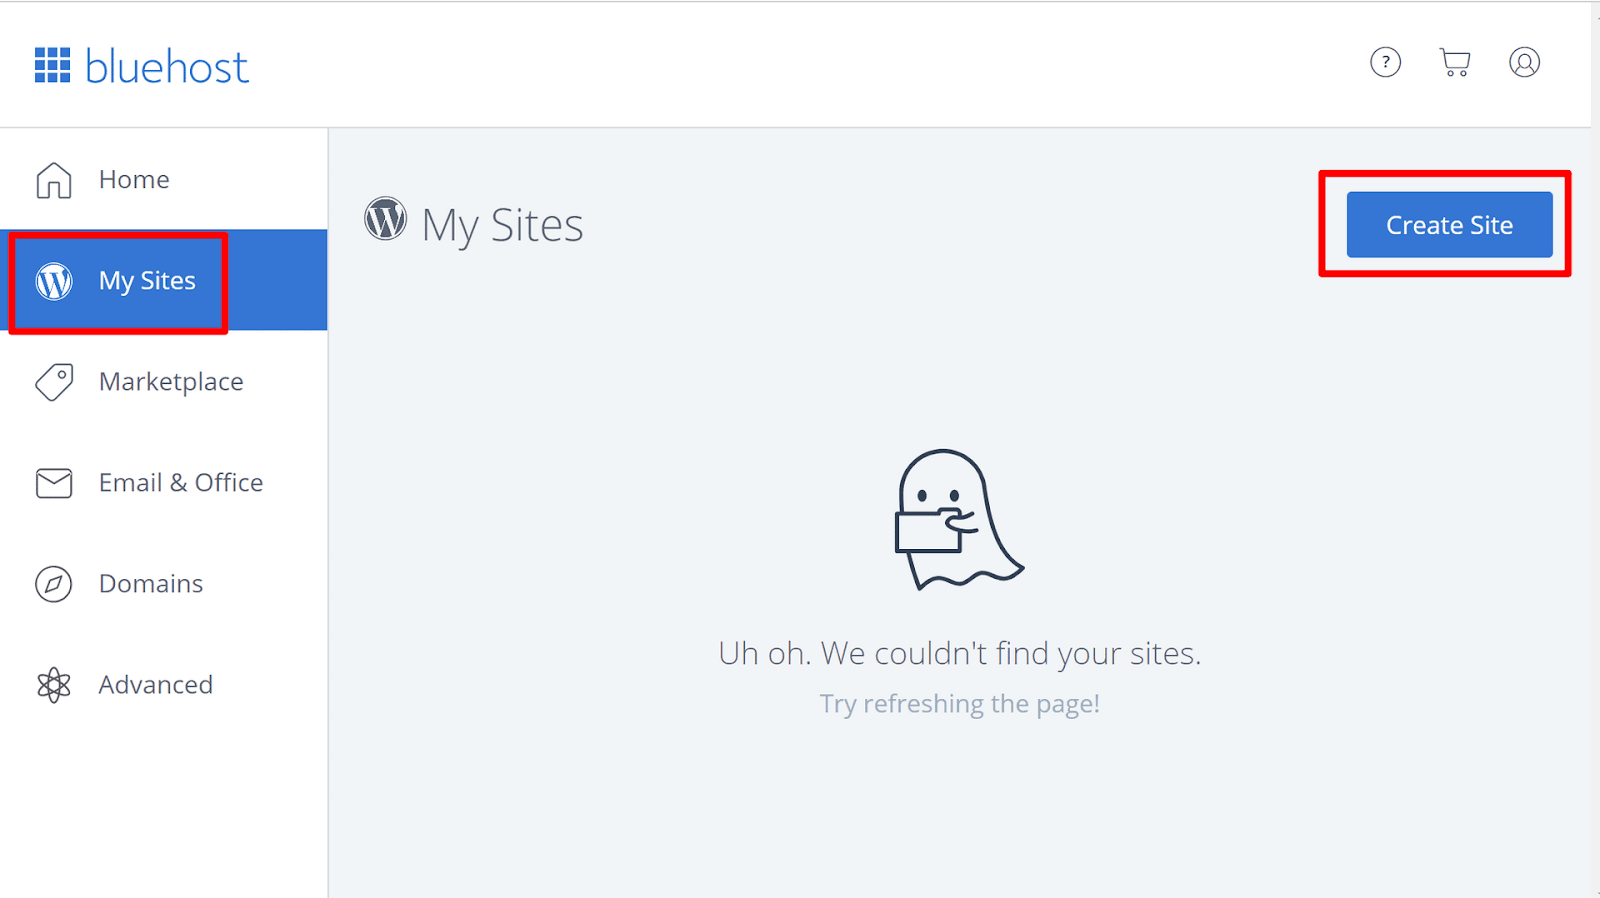
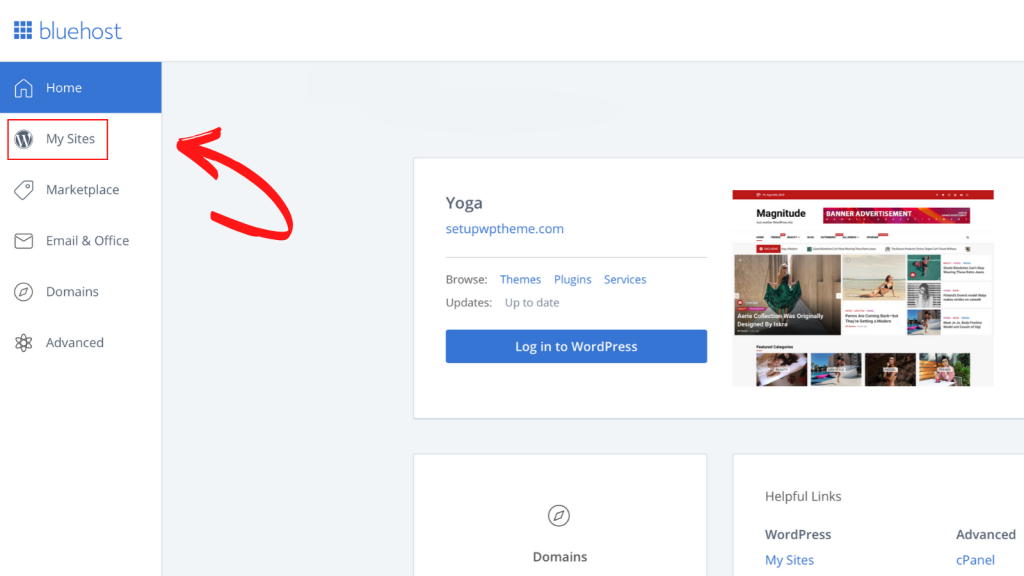
First, login to your Bluehost account to access your dashboard. Click on “My Sites” on the left navigation menu. Then, click the “Create Site” button on the top right side of the screen.
A “Start Building” button appears. Click it to start building your WordPress site.

The system will prompt you to provide information about the blog you’re about to build with WordPress. These include site name, an email address, password, administrator details, and site’s tagline.
Once you fill out the information, allow WordPress a few minutes to complete the installation.
Then, click “My Site” again and click the “Log in to WordPress button to access your newly built WordPress website.
Congratulations!
You now have a WordPress blog built from the ground up without writing a line of code.
But it doesn’t end there, or does it?
You have to make sure your site looks appealing, so that when it starts to generate traffic, readers won’t bounce back to the search engines to look for a completely different option.
In other words, you have to customize your blog to give it a professional look, which brings us to the next step.
Step 4: Choose a Theme for Your Blog
If you’ve installed WordPress successfully, you should be able to log in to a dashboard that looks something like this:
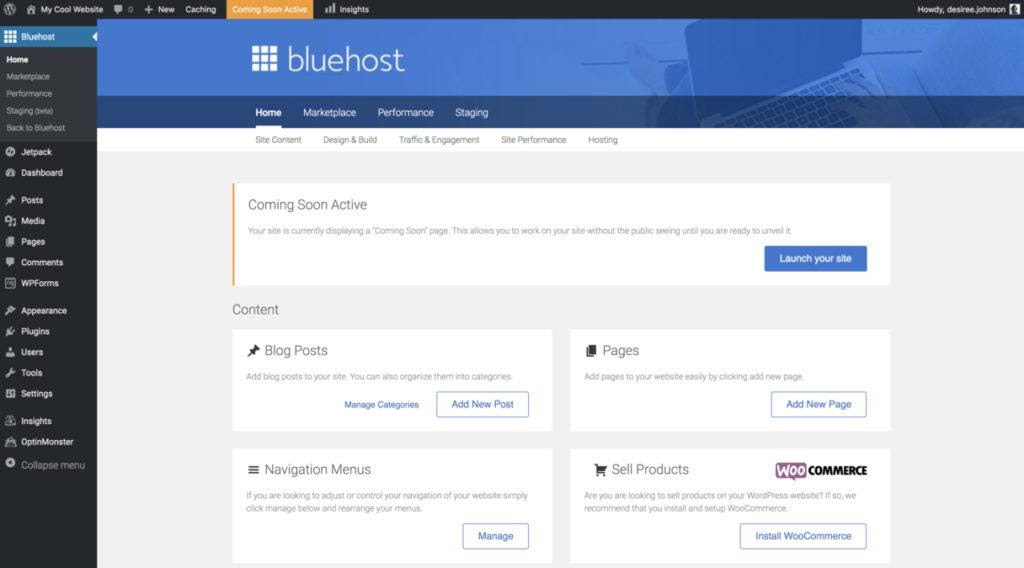
The next step is to choose a theme for your blog, which is generally canvas within which your content will go.
WordPress has hundreds of free themes in its repository, which you can access with a single click of a button. But if you need a more functional theme with features that the free options don’t have, you should consider going premium.
Bloggers have different opinions when it comes to the WordPress themes to choose. And while such cases are justifiable, you generally should consider a theme that’s mobile friendly, SEO optimized, lightweight, and easy to customize.
I have some recommendations for both free and premium themes that you can install in your WordPress website.
The best free theme that you can use for blogging are:
- GeneratePress
- Astra Theme
For the best premium themes for blogging and affiliate marketing, you should consider:
- Thrive Theme Builder
- Foodie Pro Theme and
- Acabado
These themes are generally great because they’re lightweight, mobile responsive, cross browser compatible, and SEO optimized.
Step 5: Install Only the Most Important Plugins to Improve Site Performance
It’s very easy to fall into the temptation of installing tons of plugins in your WordPress blog. I see many site owners make this mistake all the time.
Sure, plugins are great because they extend the functionality of your site. But that doesn’t mean you should go head over heels to install every blogging plugin that you can find in the plugins repository.
Some of the most important plugins that your WordPress blog must have are:
- A site speed optimization and caching plugin such as WP-Rocket
- An SEO plugin such as Yoast, Rank Math, or All in One SEO
- An image optimization plugin such as Imagify
- A page builder plugin such as Thrive Architect
- A header and footer plugin for adding necessary code snippets
Since page experience is now a ranking factor, you should invest some time to work on Core Web Vitals. I have done this with a service called NitroPack, and I must admit that the results are awesome. You can read more about Core Web Vitals here.
When it comes to plugins, the rule of the game is very simple: you should only install and activate necessary plugins.
Step 6: Create the Most Important Pages for the Blog
Many bloggers go straight to creating content before adding the most important pages to their blogs.
While there are mixed opinion among bloggers about whether to do this first, I do think it’s important to complete the setup 100%.
Do not forget to go through this article on how to legally protect your blog to avoid huge losses in case you are sued.
The most important pages to add to the blog are:
- About blog page: This page will tell your readers what your blog is about. This where you explain the central theme of your website, usually based on your niche.
- About us or me page: This page is important because it allows the audience you write for to know more about you. If you have multiple authors for the blog, make sure to write briefly about them here. I have written an article on how to write about me page that converts visitors to buyers.
- Privacy policy page: This page include details such as how you handle you process, manage, and protect your readers’ information.
- Contact us or me page: A contact page is a must-have. It make it easy for people to reach you and talk to you.
- Terms and conditions of service page: This page helps people to understand your operation policy. You should have a clear terms and conditions of service page even if you’re just an affiliate marketer on Amazon.
- Disclaimer pages: Include all the information that readers should pay very close attention to. Such information include medical disclaimer, advertising declaration, and affiliate disclosure.
- Homepage: This can be a blog roll or a place to hold pillar article depending on how you choose to structure your niche site.
- Blog Page: All your blog posts will automatically appear here if you choose to have this page on the site
Once you have these pages written, well-optimized, and published, you can start focusing on creating content and growing your niche.
Over to You
That’s all there is to it to setting up a WordPress blog from scratch. While the process is somewhat involving, it isn’t anything difficult at all.
So if you follow this guide from the first to the last step, you’ll have a professionally built WordPress blog ready to launch in under 60 minutes.
Plus, if you feel like you’ve forgotten something or missed a certain step, you can always scroll up to that section of the guide for reference.

