I’ve been blogging for more than 10 years now.
And if there’s something I’ve recently seen freaking people out more than Google algorithmic updates, it’s the core web vitals.
Clearly there’s a new wave in the blogging community. The big question currently isn’t whether it’s worth starting a blog or what niches earn more affiliate commissions and ad revenues.
It’s about how to improve core web vitals before it officially becomes a ranking factor starting June 21, 2021.
In this guide, I’ll tell you everything I did to improve core web vitals on this blog and fix all CWV errors and warning on the Google search console.
You’ll also learn about the types of metrics Google uses in their page experience test.
Let’s get started.
My Site’s Core Web Vital Scores Before and After
I’ll get to the practical details in a few but first, let me show you the before and after Core Web Vital Scores of one of my websites so you can understand what I mean.
For this test, I used PageSpeed Insights, which is quite effective in pulling up the results that we need to evaluate and improve the CWVs score.
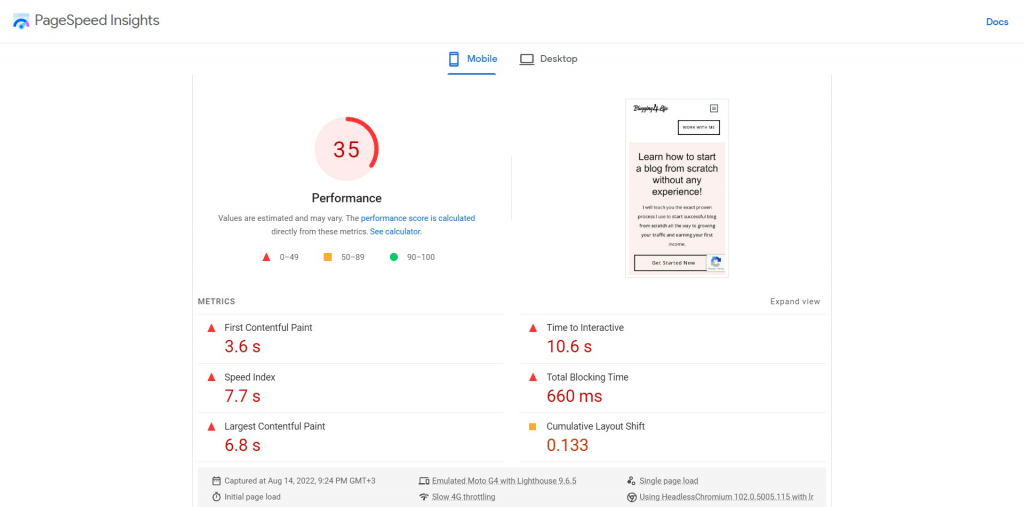
Below is a screenshot of my site pages’ overall page score before I started working on Core Web Vitals.
And below are the scores after
I achieved an average Google Page Score of 99 on mobile phones and 100 on desktop. You can go on and check any random page of this blog on Google PageSpeed Insights.
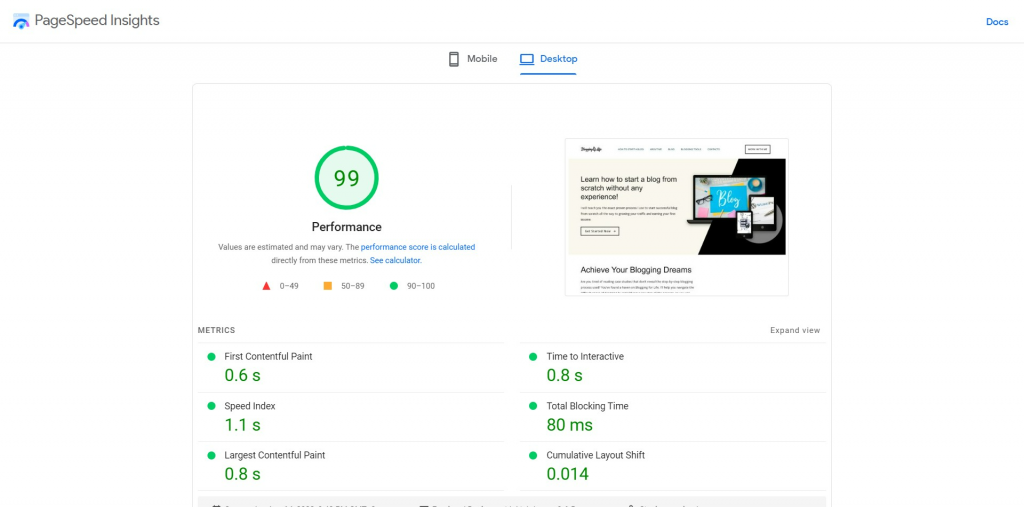
As you can see in the final image, the page experience of my website is now up to the standard. Which means I stand the chance to be on Google’s list of bloggers who own sites with decent page experience.
Getting these scores wasn’t a plug-and-play thing. It was a struggle.
Take it from me when I tell you that I tried everything professional bloggers recommend to improve these scores.
In particular, I:
- Deleted unnecessary plugins to minimize scripts on my website
- Switched from a heavy theme to a more lightweight option
- Used plugins such as Imagify to compress images to make them smaller
- Switched my DNS to Cloudflare technology
- Purchased a premium plugin to remove unused script
- And even added width and height attributes to my visual content
In short, I read all the guides I could find on the internet and implemented what they said to see if my scores would improve.
Let me say this:
The guides were up to the standard, but they were not great enough to give me the scores I was looking for.
My score did improve, but only by a small, insignificant fraction. Somehow, I felt like was still wading through mud to find my way out of the CWV mess.
Time to take a break and think of another better solution in solitude.
Finding a Solution that Made the Difference – 100/100 Page Score
After pausing this thing for the weekend to clear my head, I came across a case study on a Facebook group about a service called NitroPack.
It particularly caught my interest because the study referred to it as a plug-and-play solution. Curious, I tried it.
I started by plug in my website on this tool on their homepage to check how my FCP, LCP and CLS will improve.
These were my results that surprised me.
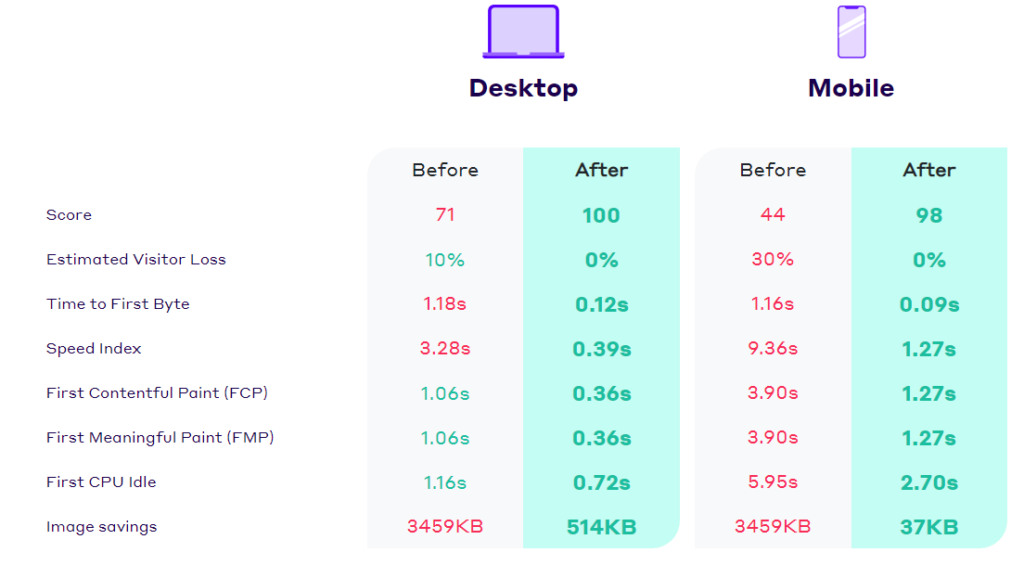
And to be frank, it was the solution that I was looking for.
Why?
Because it’s robust, delivers what it promises, and it’s downright worth the money.
But let me not get ahead of myself yet and instead tell you what NitroPack is and show you how it works.
What’s NitroPack?
NitroPack is a cloud-based technology that improves your Core Web Vital Scores and speeds up your site’s loading speed effortlessly.
Whether you have an issue with Speed Index, First Contentful Paint, or Speed Score, NitroPack will fix it for you almost in a twinkle of an eye.
It doesn’t matter if you’ve build your site on WordPress or custom coded it. This technology is easy to integrate.
And the best part is?
It’s worth the money.
What Makes NitroPack a Great Deal Against All Odds?
From a blogger’s standpoint, I want to focus on three things:
- Creating awesome content
- Growing my audience and
- Making more money
I don’t have time to figure some technical stuff out by myself. If I did, I probably would be working as a web developer.
Don’t get me wrong.
I have nothing against being a technical expert. But as someone who focuses on blogging and getting the words out there, I let NitroPack do the legwork while I focus on what matters: creating awesome blog posts for my niche websites.
Why NitroPack?
The reason is simple; it has tons of features that no other similar technology on the planet has. In fact, with NitroPack, you can:
- Improve your Core Web Vital instantly without configuring tons of plugins
- Improve the user experience of your website and make even more money
- Increase your website’s loading speed without writing code
- Optimize all type of code with just a single click
- Improve customer experience and make Google fall in love with your site
How cool?
How Much Does NitroPack Cost?
If you just created a new website and are currently working on adding content, I recommend you use the free version of the NitroPack package. While the free plan doesn’t offer priority support, you still get the benefits of paid membership which is limited. The free plan does place a link back to NitroPack in your website’s footer as a way to give them credit for their work.
However, keep in mind that if your site starts to get more than 5,000 visitors a month, you’ll have to upgrade to a paid plan to keep your Core Web Vitals scores in good standing.
I recommend you get a premium plan if you have a large and old website. They offer a 5% discount when you subscribe using this coupon code FASTWPBLOG.
Below are their current subscription price per website when I published this post. Price may change overtime.
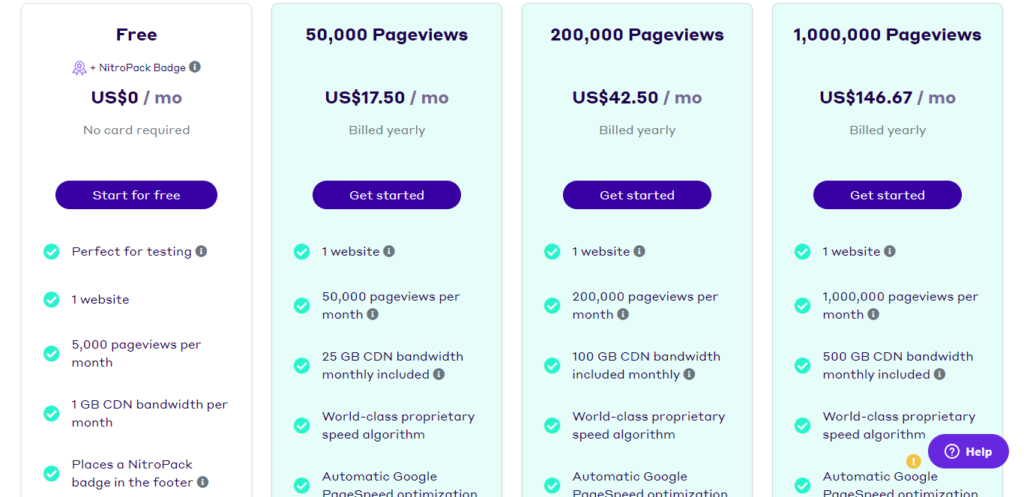
Since 50% of my niche sites have estimated traffic of around 150,000 visitors per month, I’m on the $42.50 plan. So far, my experience with the service has been great, especially since they fix Core We Vitals on the fly.
My only problem with the pricing is that it’s per site. So assuming you have three websites, each getting at least 30,000 visitors per month, you’ll have to pay $47.25 per month billed annually and there is a different price if you pay monthly.
The limitation notwithstanding, I can say without a doubt that NitroPack is the best in the business of improve your Core Web Vitals score on the fly.
How Do I Connect My Blog to NitroPack?
It takes me about 5 minutes to setup NitroPack on any site whose page experience I want to improve without getting my hands dirty.
I believe it should take you the same amount of time, and less than that if you’re quick.
To get started:
- Choose a suitable plan from here.
- Create an account and add your site’s address to the NitroPack dashboard.
- Login to your WordPress dashboard, go to plugins and install and activate the NitroPack plugin
- Copy Site ID and Site Secret from your NitroPack dashboard and paste them to the NitroPack plugin to connect the site. They have step by step guide on how to set up your blog at their help center.
Now it’s just a matter of letting NitroPack do the optimization work for you.
The service does the heavy lifting job on your behalf, so you can focus on keyword research, content creation, link building, and making sales.
What are Core Web Vitals and Why Should You Care?
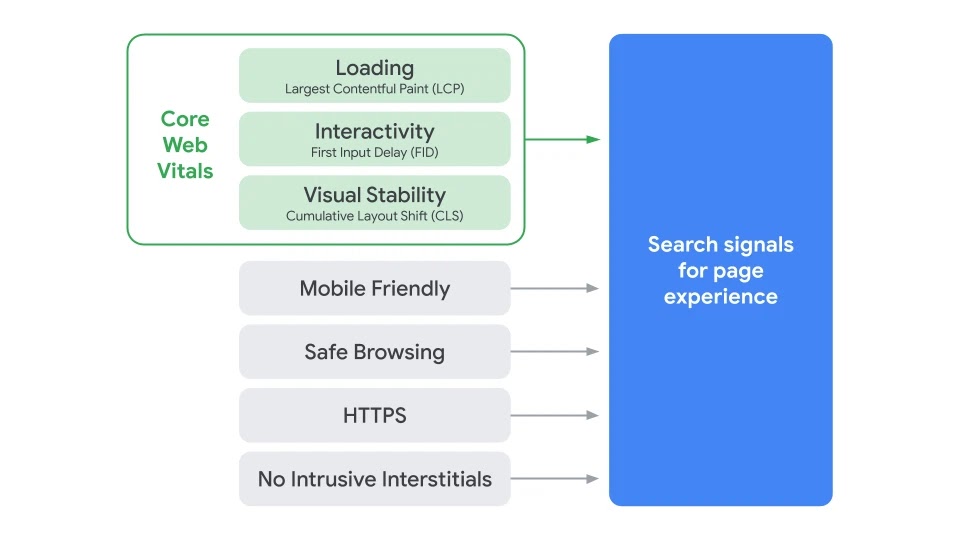
Although they’re yet to become part of Google search rankings, Core Web Vitals are important page speed and user interaction measurements that you should take seriously- and so right now.
While there are up to 7 measurements that Google use to evaluate the overall user interaction with a web page, Core Web Vitals will deal with three significant metrics: largest contentful paint, cumulative layout shift, and first input delay.
Because Google plans to make page experience a ranking factor, your search traffic and organic presence may plummet if you don’t optimize for Core Web Vitals.
Think about it like this:
Would you wait 60 seconds for a web page to load to access information? Well, not exactly.
And even if the page loaded faster but the content was difficult to consume because of moving elements all over the page, you still would have a terrible user experience.
The truth is no one loves badly made, slow-loading websites, and the people at Google aren’t about to be the exception.
So when it comes to getting your site ready for the page experience update, you need to treat the core web vital issue with the utmost urgency.
The Main Three Types of Core Web Vitals – FCP, LCP & CLS
Before Google came up with Core Web Vitals, they used factors such as safe browsing, mobile friendliness, and HTTS to measure page experience.
They still use these factors to date. Only they’re now putting more emphasis on three main measurements to valuate page experience.
Cumulative Layout Shift
Are the elements on your web page stable as the page loads? Or do you notice the lack of visual stability that Google is looking for?
If there are elements moving around as the scripts behind a page on your website loads, you have a Cumulative Layout Shift issue that you need to fix fast.
The elements on your page have to be stable because you don’t want to distract your readers once the page fully loads. In other words, you have to fix your CLS so that your visitors don’t get confuse about where links are, what images to look at, and where to click next.
How to Fix Cumulative Layout Shift
Cumulative Layout Shift seems to be the biggest issue with many websites that I’ve interacted with at the time of writing this guide.
And quite frankly, I’ve no idea if Google will drop websites that don’t have good CLS score out of its index or just demote them a few positions in the SERPs. What I do know is that there are a few things you can do to get a better CLS score for your website.
- Add width and height dimensions to any media that you include in your pages. This is important because it enables the browser to know how much space that specific element will take.
- Make sure to add new UI elements below the fold, not above it. You want to avoid pushing content further down when a visitor already knows where the content should stay.
- Reserve space for ad elements to keep them from appearing where they shouldn’t or pushing content further away from where it should be in the first place.
Largest Contentful Paint
Largest Contentful Paint looks at how long it takes a page to load and display content as soon as a user clicks a link to a page. Content in this case can be anything, from an article and an image to a video or an infographic.
Unlike First Contextual Paint and TTFB that focus only on page speed, the Large Contentful Paint represents how fast a real visitor takes to see content load before they begin to interact with that specific web page.
How to Fix Largest Contentful Paint
If some pages on your site don’t hit LCP within 2.5 seconds or less, you have some work to do.
And given that sites vary in size, with different content types, from images to text to videos, all put together in one page, fixing the Largest Contentful Paint isn’t as easy as installing a plugin or activating a CDN for a quick fix.
Fixing LCP, or improving your overall score, requires some bit of technical SEO. But I can assure you that it’s nothing too complicated if you’re doing Search Engine Optimization.
Some of the things you can do include:
- Enabling image lazy load can go a long way to improve the Large Contentful Paint score of your website. With images loading as a reader scrolls down the page, it’s easy to achieve a significantly higher LCP.
- Remove elements that are slowing down your site and returning a lower LCP score. You can use the PageSpeed Insights Tool to see which of your pages have elements that could be potentially slowing down your LCP.
- Check if your site has unnecessary third-party scripts. A study by Backlinko reveals that third-party scripts can lower a page’s load time by at least 34ms, which is a lot of time in Google search engine’s eyes
- Upgrade to a better web hosting company. The general consensus in the blogging community is that if you want to improve your site’s loading speed as well as the LCP scores, it’s best to your hosting to a better service before Core Web Vitals become a ranking factor.
First Input Delay
When it comes to analyzing your website for First Input Delay, you have to ask yourself whether visitors can interact with your pages in real time.
Some examples of interactions that FID measures include writing an email address, choosing a menu option from a navigation menu, and clicking a link.
In other words, Google uses First Input Delay to determine how long a reader takes to complete an action on a web page.
FID won’t be the same for all websites. If you run a news site or a blog, First Input Delay bundles up to scrolling down the content pages.
If your site has pages that require visitors to take an action such as signing up for an offer, creating an account, or login in, FID is going to be a very important factor to consider.
How to Fix First Input Delay
There are at least three things you can do to fix First Input Delay and improve your overall score.
- Enable browser caching: browser caching is a unique approach to improving the page experience of your site because it serves up pages to your readers faster. Cached sites make it easy for the web browser to blast through JavaScript load time, thus reducing how long it takes for the script to load.
- Disable irrelevant third-party scripts: Third party scripts can affect your First Input Delay’s score. So unless a third-party script, such as Google Search Console and Google Analytics is a must-have, delete them from your site.
- Minimize JavaScript: An SEO approach to improving page interaction and overall user experience is to make sure JavaScript loads fast. So it’s best to minimize JS to improve your First Input Delay score, otherwise your visitors will find your website pages difficult to interact with.
Over to You – Fix Those Core Web Vitals Errors & Warnings On Google Search console!
I’ve shown you how you can improve your Core Web Vitals score to make your site user and search engine friendly.
Nitropack will Speed up your website and improve your blog's core web vitals effortlessly.
However, I need to state clearly that having the best web page experience will not magically shoot your posts to the first page of Google.
At the end of the day, Google uses more than 200 ranking factors to determine whether your content is worth showing in its index.
So as you focus on satisfying Google’s need to improve page experience, you should also focus on the most important ranking factors to grow your blog’s traffic.

